Introduction
Hello! In this blog post, I will be helping you to get started with deploying your very own eepsite!
In order to do this, we will be using the following software:
- I2P
- SSH
- Hugo
- Darkhttpd
- A text editor of your choice
Let’s get started!
Deploying the Server
The very first thing you need to do, is choose if you want to host the eepsite from home, on-prem, or off-site on a hosting provider.
If you choose a hosting provider, you will need to buy a VPS. A good option that allows Monero payments is:
- IncogNET
Once you have deployed the server, connect to it using SSH and meet me in the next step.
Creating an Administrative User
Now let’s create an administrative user:
# adduser admin
Then use it:
# su - admin
Hugo
Installing Hugo
The next step is to install Hugo, which is a static site generator that is very easy to use.
- Update Your System: Before installing any new software, it’s a good practice to update your system’s package lists to ensure you have access to the latest software packages. Open your terminal and run:
sudo apt update
sudo apt upgrade
- Install Hugo Using APT: The simplest way to install Hugo on Debian is by using the Advanced Package Tool (APT). This method is straightforward but may not always provide the latest version of Hugo. To install Hugo using APT, run:
sudo apt install hugo
After installation, you can check the installed version of Hugo by running:
hugo version
- Alternative Method: Install a Specific Version of Hugo: If you need a specific version of Hugo or want to ensure you have the latest version, you can download it directly from the Hugo releases page on GitHub and install it using the Debian Package Management System (dpkg). First, visit the Hugo releases page and download the
.debfile for the version you want. Then, use thedpkgcommand to install it. For example, if you downloadedhugo_extended_0.111.3_linux-amd64.deb, you would run:
sudo dpkg -i hugo_extended_0.111.3_linux-amd64.deb
Replace hugo_extended_0.111.3_linux-amd64.deb with the name of the file you downloaded.
- Verify Installation: After installation, you can verify that Hugo is installed correctly by running:
hugo version
This command will display the installed version of Hugo, confirming that the installation was successful.
Using Hugo
Creating a new site:
hugo new site my-website
admin@Hugo-Demo:~$ hugo new site my-website
Congratulations! Your new Hugo site is created in /home/admin/my-website.

Just a few more steps and you're ready to go:

1. Download a theme into the same-named folder.
   Choose a theme from https://themes.gohugo.io/ or
   create your own with the "hugo new theme <THEMENAME>" command.
2. Perhaps you want to add some content. You can add single files
   with "hugo new <SECTIONNAME>/<FILENAME>.<FORMAT>".
3. Start the built-in live server via "hugo server".

Visit https://gohugo.io/ for quickstart guide and full documentation.
admin@Hugo-Demo:~$
This will create a new site called my-website
Setup Luke’s theming:
cd my-website
git clone https://github.com/lukesmithxyz/lugo themes/lugo
echo "theme = 'lugo'" >> hugo.toml
cp themes/lugo/static/style.css static/
Create site:
hugo
This exports the changed files to the public/ dir, which turns them into .html files.
Darkhttpd
Installing Darkhttpd as a Reverse Proxy
Now we need to install a webserver as a reverse proxy to handle incoming connections.
First, let’s create a system account for Darkhttpd to drop privileges to:
sudo adduser --system --shell /usr/sbin/nologin --home /var/www www
Next, let’s install the acl package in order to allow our admin user to create files there, but also allow the www user to read the files there:
sudo apt install acl
Create the working directory for the website:
sudo mkdir /var/www
Set the ownership of /var/www to the admin user:
sudo chown admin:nogroup /var/www
Harden the permissions:
chmod 750 /var/www
Add the www user:
setfacl -d -m user:www:r-- /var/www
The -d flag ensures all newly created files under /var/www will get these permissions for the www user.
Now, ensure that gcc and build-essential is installed in order to use make to build Darkhttpd:
admin@Hugo-Demo:/var/www$ gcc --version
gcc (Debian 12.2.0-14) 12.2.0
Copyright (C) 2022 Free Software Foundation, Inc.
This is free software; see the source for copying conditions.  There is NO
warranty; not even for MERCHANTABILITY or FITNESS FOR A PARTICULAR PURPOSE.

admin@Hugo-Demo:/var/www$
If they’re not installed, you can install them using:
sudo apt install gcc build-essential
Next, clone the repo for Darkhttpd:
git clone https://github.com/emikulic/darkhttpd.git
Then build it:
cd darkhttpd
make
Harden the permissions:
chmod 750 darkhttpd
Move it:
sudo mv darkhttpd /usr/local/bin
Now we’re ready to handle incoming requests!
Using Darkhttpd
First, let’s move the website we created earlier into the proper /var/www directory:
mv ~/my-website /var/www
Then change the working directory to there:
cd /var/www/my-website
One thing I noticed, was that I couldn’t use the --uid and --gid feature on Kicksecure Debian 12 for some reason. It kept giving operation not permitted error.
To workaround this, I decided to create a systemd service file:
[Unit]
Description=Darkhttpd Web Server
After=network.target

[Service]
Type=simple
User=www
Group=nogroup
WorkingDir=/var/www/eepsite/public
ExecStart=/usr/local/bin/darkhttpd /var/www/eepsite/public --port 1337 --addr 127.0.0.1 --log /var/log/darkhttpd/access.log
Restart=always
StandardOutput=append:/var/log/darkhttpd/darkhttpd.log
StandardError=append:/var/log/darkhttpd/error.log

[Install]
WantedBy=multi-user.target
Then I started the service, and it successfully runs as the www user:
sudo systemctl start darkhttpd

admin@hugo:/var/www/eepsite$ sudo systemctl status darkhttpd
● darkhttpd.service - Darkhttpd Web Server
     Loaded: loaded (/etc/systemd/system/darkhttpd.service; disabled; preset: enabled)
     Active: active (running) since Sun 2024-03-24 21:30:10 CET; 12min ago
   Main PID: 36243 (darkhttpd)
      Tasks: 1 (limit: 2310)
     Memory: 204.0K
        CPU: 13ms
     CGroup: /system.slice/darkhttpd.service
             └─36243 /usr/local/bin/darkhttpd /var/www/eepsite/public --port 1337 --addr 127.0.0.1 --log /var/log/darkhttpd/access.log

admin@hugo:/var/www/eepsite$ ps aux | grep darkhttpd
www        36243  0.0  0.0   2492   864 ?        Ss   21:30   0:00 /usr/local/bin/darkhttpd /var/www/eepsite/public --port 1337 --addr 127.0.0.1 --log /var/log/darkhttpd/access.log
admin        37197  0.0  0.1   6332  2144 pts/0    S+   21:43   0:00 grep darkhttpd
Verifying It Works
Now let’s see if we can access the website files!
admin@Hugo-Demo:/var/www$ curl 127.0.0.1:1337
<!DOCTYPE html>
<html lang="en">
<head>
<meta name="generator" content="Hugo 0.111.3">
<title>My New Hugo Site</title>
<link rel="canonical" href="http://example.org/">
<link rel='alternate' type='application/rss+xml' title="My New Hugo Site RSS" href='/index.xml'>
<link rel='stylesheet' type='text/css' href='/style.css'>
<link rel="icon" href="/favicon.ico">
<meta name="description" content="">
<meta name="viewport" content="width=device-width, initial-scale=1">
<meta name="robots" content="index, follow">
<meta charset="utf-8">
</head>
<body>
<main>
<header><h1 id="tag_My New Hugo Site">My New Hugo Site</h1></header>
<article>
<ul>
<li><time datetime="2024-03-24T16:03:30Z">2024 Mar 24</time> – <a href="/about/">About</a>
</li>
</ul>
</article>
</main>
<footer>
<a href="http://example.org/">http://example.org/</a><br><br><a href="/index.xml"><img src="/rss.svg" style="max-height:1.5em" alt="RSS Feed" title="Subscribe via RSS for updates."></a>
</footer>
</body>
</html>
admin@Hugo-Demo:/var/www$
It works!
Troubleshooting
While setting up Darkhttpd, I noticed LXC containers in Proxmox don’t allow you to change the user running Darkhttpd using –uid and –gid. At least not without sudo (which in turn causes the “main” Darkhttpd process to run as the admin user, which is not optimal).
If anybody knows how to solve this, please do let me know!
Creating Articles with Hugo
Now we’re ready to create our first page on the website!
But first, let’s talk a little about the structure Hugo uses.
admin@Hugo-Demo:/var/www/my-website$ ls
archetypes  assets  config.toml  content  data  hugo.toml  layouts  public  resources  static  themes
admin@Hugo-Demo:/var/www/my-website$
The following directories are used:
archetypes/- This directory contains template files, which are then in turn used when creating a new content file using hugo, i.ehugo new article.md.
admin@Hugo-Demo:/var/www/my-website$ cat archetypes/default.md
---
title: "{{ replace .Name "-" " " | title }}"
date: {{ .Date }}
draft: true
---

admin@Hugo-Demo:/var/www/my-website$
The contents of this file will automatically be copied over to all newly created content files.
-
assets/- This directory is used for assets such as CSS, JavaScript and images. These files are processed by Hugo. -
content/- This is where your actual content files go. That is, your blog articles, pages etc. Basically everything that isn’t CSS, javqscript, images etc. Think markdown files. -
data/- This directory is used for storing data files such as YAML, JSON or TOML, and are used to store site-wide data, such as author bios or site configurations. -
layouts/- This directory contains the templates that structure the actual site pages. Hugo uses these to render your content into HTML. -
static/- Here goes static files that should be copied directly into the root of your site without any processing, such as the main style.css file. Other files include images, CSS and JavaScript files that should not be processed by Hugo. -
themes/- Here goes your Hugo theme that should be used, in our example scenario it is the one created by Luke Smith. -
hugo.toml- The actual configuration file for Hugo.
Let’s change the config file for Hugo:
nvim config.toml
baseURL = 'http://yourB32URLGoesHeeeere.i2p/'
languageCode = 'en-us'
title = 'Our new site'
theme = 'lugo'
Now with that over, let’s create our new page:
hugo new about.md
admin@Hugo-Demo:/var/www/my-website$ hugo new about.md
Content "/var/www/my-website/content/about.md" created
admin@Hugo-Demo:/var/www/my-website$
This has created a new about.md file under /var/www/my-website/content/about.md, which we can edit, add Markdown and Hugo will render this into HTML automatically!
Let’s add some content:
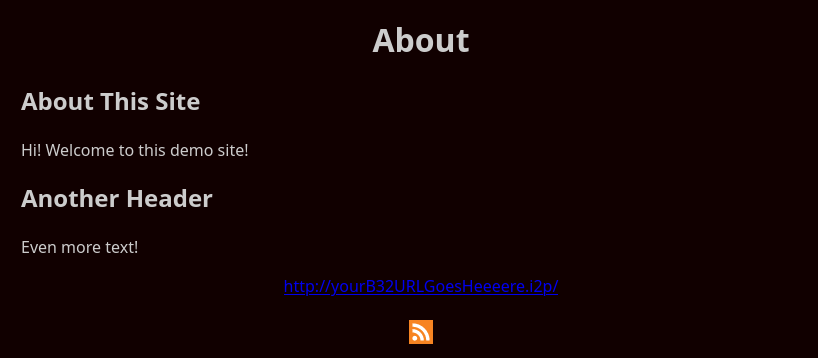
nvim content/about.md
---
title: "About"
date: 2024-03-24T16:03:30Z
draft: true
---
# About This Site

Hi! Welcome to this demo site!

## Another Header

Even more text!
When you want this content file to actually be processed by hugo, change draft: true to draft: false, or remove the line entirely.
Then, run hugo. This will process any changed files and render them into HTML!
hugo
admin@Hugo-Demo:/var/www/my-website$ hugo
Start building sites …
hugo v0.111.3+extended linux/amd64 BuildDate=2023-03-16T08:41:31Z VendorInfo=debian:0.111.3-1

                   | EN
-------------------+-----
  Pages            |  7
  Paginator pages  |  0
  Non-page files   |  0
  Static files     |  2
  Processed images |  0
  Aliases          |  0
  Sitemaps         |  1
  Cleaned          |  0

Total in 75 ms
admin@Hugo-Demo:/var/www/my-website$
Now let’s see how it looks when we visit the website again!
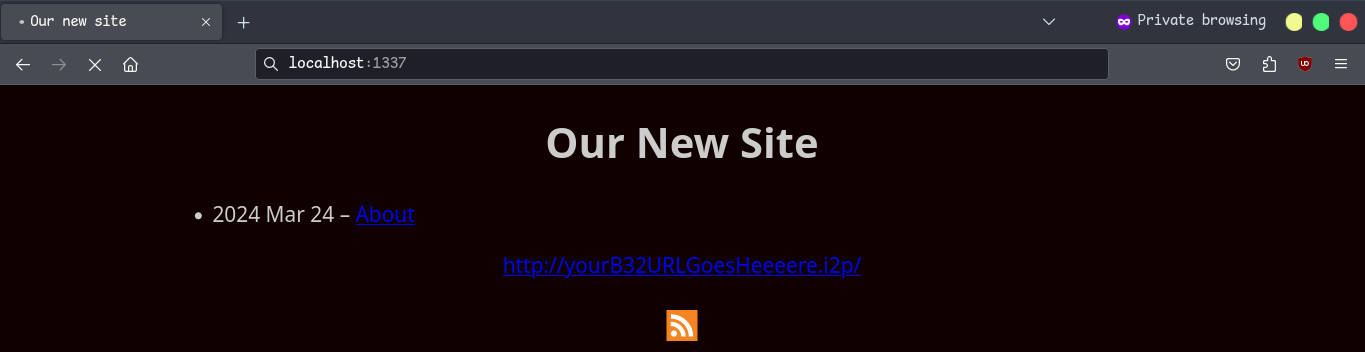
As you can see, this theme automatically:
-
Adds dates to new content
-
Adds a link to the homepage on the footer
-
Creates an RSS feed for the website
Now if we visit the About page, we can see the content we added:
That’s it for now! It’s enough to get a working site up and running.
I may add more guides as time goes on.